Do you know that there are 7 ways to install an npm package? I bet you don't know all.
Hello everyone 👋,
In this article, I'm going to share how to use the npm install CLI command efficiently with different ways of installing a package.
Before going to the CLI command, let us learn what is npm.
What is npm?
npm is the world's largest software registry. Open-source developers from every continent use npm to share and borrow packages, and many organizations use npm to manage private development as well.
Let's understand these key terms from the definition.
registry - Registry is a large public database of JavaScript software where software developers push their package to it. It is similar to Google Playstore.
packages - Packages are the software that a developer has created and pushed to it. It is similar to an APK to Google Playstore.
Developers - Developers are the one who creates the package, pushes to the registry and pull the other packages from the registry to use it in their application.
The below diagram shows how npm works

Ways to use npm install
To understand it, first, create an empty directory with the name as npm-install-ways.
mkdir npm-install-ways
cd npm-install-ways/
mkdir - helps to create the directory. The second argument is the directory name.
cd - helps to navigate it to the specific directory.
Now, run npm init and press enter continously for all the prompts to have a default value. Finally, a package.json file will be created in the same path.
npm init
This utility will walk you through creating a package.json file.
It only covers the most common items, and tries to guess sensible defaults.

See `npm help init` for definitive documentation on these fields
and exactly what they do.

Use `npm install <pkg>` afterwards to install a package and
save it as a dependency in the package.json file.

Press ^C at any time to quit.
package name: (npm-install-ways)
version: (1.0.0)
description:
entry point: (index.js)
test command:
git repository:
keywords:
author:
license: (ISC)
About to write to /Users/yuvaraj/Documents/blog article projects/npm-install-ways/package.json:

{
  "name": "npm-install-ways",
  "version": "1.0.0",
  "description": "",
  "main": "index.js",
  "scripts": {
    "test": "echo \"Error: no test specified\" && exit 1"
  },
  "author": "",
  "license": "ISC"
}


Is this OK? (yes)
Open package.json file to see the content.
{
  "name": "use-of-typescript",
  "version": "1.0.0",
  "description": "",
  "main": "index.js",
  "scripts": {
    "test": "echo \"Error: no test specified\" && exit 1"
  },
  "author": "",
  "license": "ISC",
  "dependencies": {},
  "devDependencies": {}
}
If you see in the above output, the dependencies & devDependencies have an empty object. What does that mean?
It tells that, our application is not dependent on any package from the registry. (for now)
1. Installing a package without any argument
Assume that our application needs a jquery package. You can install it with the below command.
npm install jquery
Impacts:
It does few operations.
- Pulls the latest jquery package from npm.
- Install the
jquerypackage in thenode_modulesfolder. - Adds
jqueryto thedependenciesobject in the package.json file.
This is the current package.json content,
{
  "name": "npm-install-ways",
  "version": "1.0.0",
  "description": "",
  "main": "index.js",
  "scripts": {
    "test": "echo \"Error: no test specified\" && exit 1"
  },
  "author": "",
  "license": "ISC",
  "dependencies": {
    "jquery": "^3.6.0" // <--- this is added
  }
}
2. Installing a package with --no-save argument
TypeScript becomes so popular by providing features like typings, interface, enums, etc... Now, you thought of trying it out temporarily without adding to the dependencies list in package.json.
In this scenario, you should use the --no-save argument while installing it.
npm install typescript --no-save
Impacts:
It does 2 operations.
- Pulls the latest typescript package from npm.
- Install the
typescriptpackage in thenode_modulesfolder.
This is the package.json content.
{
  "name": "npm-install-ways",
  "version": "1.0.0",
  "description": "",
  "main": "index.js",
  "scripts": {
    "test": "echo \"Error: no test specified\" && exit 1"
  },
  "author": "",
  "license": "ISC",
  "dependencies": {
    "jquery": "^3.6.0"
  }
}
It skips the 3rd operation from the 1st approach. Let's check if the typescript package is available in node_modules directory.
.
└── node_modules
    ├── jquery
    └── typescript
Yes, it is there. Let's move on to the next one!
3. Installing a package only for the development environment
Do you know that you can install a npm package only for a development environment?
Yes, you can. Let's see it in action.
Assume that, we need to write a unit test case that requires a jasmine package.
Let's install it with the below command.
npm install jasmine --save-dev
This is the package.json content.
{
  "name": "npm-install-ways",
  "version": "1.0.0",
  "description": "",
  "main": "index.js",
  "scripts": {
    "test": "echo \"Error: no test specified\" && exit 1"
  },
  "author": "",
  "license": "ISC",
  "dependencies": {
    "jquery": "^3.6.0"
  },
  "devDependencies": {
    "jasmine": "^3.8.0" <--- Added jasmine here
  }
}
Impacts:
It does few operations.
- Pulls the latest jasmine package from npm.
- Install the
jasminepackage in thenode_modulesfolder. - Adds
jasmineto thedevDependenciesobject in the package.json file. (Note: It adds todevDependencies, not underdependencies)
So, you might be wondered what is the difference between this approach and the previous approaches.
Suppose, your application size is 10MB including the jasmine package which is 2MB. In the production environment, it is not required to have a jasmine package. So, If you install all application dependencies with npm install --production in the production server, it excludes the jasmine package from your application bundle since it is used only for development purposes.
And, thus it reduces your application build to 8MB from 10MB. Awesome!
4. Installing a specific package version
In our application, our jquery package version is 3.6.0. The latest version seems to have some problems. So, you are feeling to revert it to the older version (maybe 3.5.0) to make it work.
Let's see how to do it.
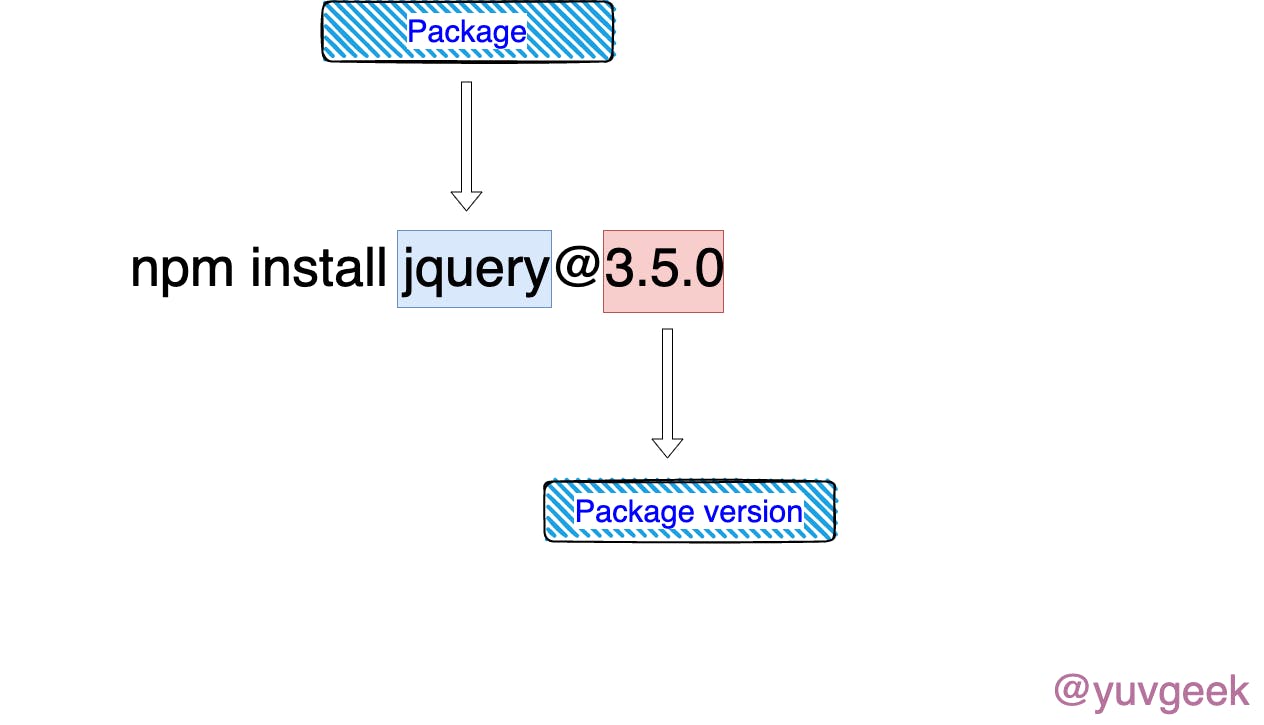
npm install jquery@3.5.0

Impacts:
- Pulls the specific jquery package version from npm. In this case, it is
3.5.0. - Installs the specific jquery package in the
node_modulesfolder. (It removed 3.6.0 and installed 3.5.0). - Updates the
jqueryversion in thedependenciesobject in the package.json file.
This is the package.json content.
{
  "name": "npm-install-ways",
  "version": "1.0.0",
  "description": "",
  "main": "index.js",
  "scripts": {
    "test": "echo \"Error: no test specified\" && exit 1"
  },
  "author": "",
  "license": "ISC",
  "dependencies": {
    "jquery": "^3.5.0" <--- changed from 3.6.0 to 3.5.0
  },
  "devDependencies": {
    "jasmine": "^3.8.0"
  }
}
5. Installing a package version in a given range
Let's try one more approach.
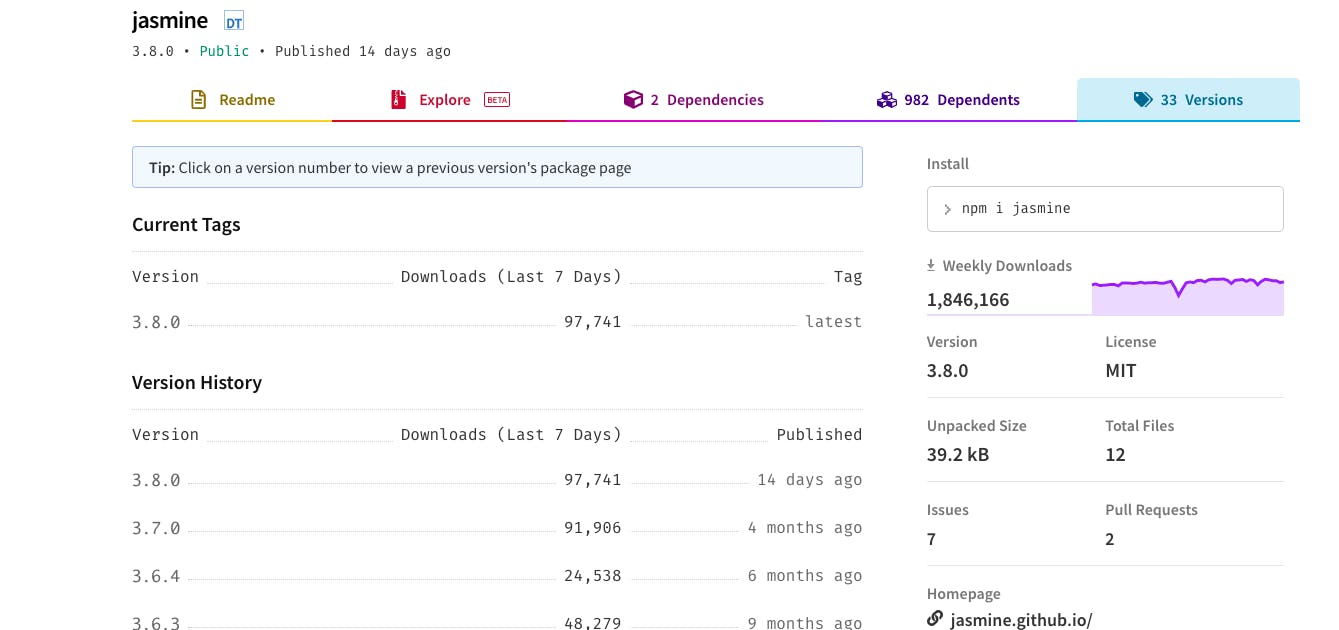
These are the few versions of jasmine versions available in npm.

Our application has a jasmine package in the 3.8.0 version. This version seems to be buggy and you wanted to go back to the last available version.
So, without knowing the exact version number, you can install those by,
npm install jasmine@"<3.8.0" --save-dev
Impacts:
- Pulls the jquery package version which is lesser than
3.8.0from npm. In this case, it is3.7.0. (See the above screenshot). - Then, it Installs the jquery package in the
node_modulesfolder. (It removed 3.8.0 and installed 3.7.0). - Updates the
jqueryversion in thedevDependenciesobject in the package.json file.
This is the package.json content.
{
  "name": "npm-install-ways",
  "version": "1.0.0",
  "description": "",
  "main": "index.js",
  "scripts": {
    "test": "echo \"Error: no test specified\" && exit 1"
  },
  "author": "",
  "license": "ISC",
  "dependencies": {
    "jquery": "^3.5.0"
  },
  "devDependencies": {
    "jasmine": "^3.7.0" <--- It updated from 3.8.0 to 3.7.0
  }
}
Similarly, you can install the version by combining the lesser than (<) & greater than(>) symbols.
Example,
npm install jasmine@">3.0.0 <3.5.0" --save-dev
The above command finds the jasmine version, which should be above 3.0.0 and lesser than 3.5.0. In this case, it installs 3.4.0.
6. Install package from tarball URL
You can also install the npm package with the tarball. It can be a local (or) remote file.
Let's install the jquery 3.3.0 version package from the tar file available in Github tags.
npm install https://github.com/jquery/jquery/archive/refs/tags/3.3.0.tar.gz
It does the same operation as #1. Instead of pulling from the npm registry, it is installed from the tarball URL which is available on the jquery Github page.
This is the package.json content.
{
  "name": "npm-install-ways",
  "version": "1.0.0",
  "description": "",
  "main": "index.js",
  "scripts": {
    "test": "echo \"Error: no test specified\" && exit 1"
  },
  "author": "",
  "license": "ISC",
  "dependencies": {
    "jquery": "https://github.com/jquery/jquery/archive/refs/tags/3.3.0.tar.gz" <--- Installed from Github Tarball URL
  },
  "devDependencies": {
    "jasmine": "^3.4.0"
  }
}
Let's move on to the final approach.
7. Install npm package with a different name
So far, when we install a different version of a package, the existing one is deleted in the node_modules folder & it installs the specified version provided
What if there is a way you can keep both package versions?
In the last approach #6, we have installed jquery version 3.3.0 from Github tags. Let's try to install the jquery version 2 by keeping a customized package name for the jquery version 2.

npm install jquery-ver-2@npm:jquery@2
Impacts:
- Pulls the jquery ver 2 package version from npm.
- Created an alias name for it. In this case, it is jquery-ver-2.
- Then, it Installs the jquery package in the
node_modulesfolder. The folder will be jquery-ver-2. - Adds the
jqueryversion 2 in the name of jquery-ver-2 in thedependenciesobject in the package.json file.
This is the package.json content.
{
  "name": "npm-install-ways",
  "version": "1.0.0",
  "description": "",
  "main": "index.js",
  "scripts": {
    "test": "echo \"Error: no test specified\" && exit 1"
  },
  "author": "",
  "license": "ISC",
  "dependencies": {
    "jquery": "https://github.com/jquery/jquery/archive/refs/tags/3.3.0.tar.gz",
    "jquery-ver-2": "npm:jquery@^2.2.4" <--- Jquery 2 is installed as jquery-ver-2.
  },
  "devDependencies": {
    "jasmine": "^3.4.0"
  }
}
I hope you enjoyed this article or found it helpful.
You can connect with me on Twitter & Github 🙂
Support 🙌
You can support me by buying me a coffee with the below link 👇

